Perhaps you have an old bathtub and now want to change it for a larger one or one that you can use for soaking in. A new bathtub brings a refreshing look to the bathroom interior. However, if your floor is made of concrete or cement, bathtub installation will require some special preparations.
Not that you would need help from a professional, but knowing the ins and outs of how to install a bathtub on a concrete floor will ease out your workload. Furthermore, you will enjoy a convenient installation process without damaging or breaking the floor and tub.
An Effective Way to Install A Bathtub on A Concrete Floor
Nowadays most homeowners choose an acrylic bathtub and alcove bathtub for their bathroom because this is durable and inexpensive also. The installation is pretty easy for this bathtub.
So, let’s get-go to see how to install a bathtub on the concrete floor.
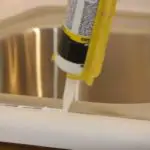
Step 1: Securing the Spray Area
For those who aren’t familiar with the spray area term, it means the area of the floor and nearby wall of the bathtub that will receive water splash as you bath on the tub. The spray area needs to be splash and waterproof, even for the tiled floors.
So, apply a unique sealing material on the wall to make it waterproof. You will find lots of these sealers in nearby plumbing shops. However, clean the wall properly before applying the sealing material so that it sticks on the wall accurately.
Step 2: Leveling the Floor
Sometimes it happens that the concrete or tiled floor remains uneven even after much concentration at work. These are human errors that none can avoid. However, an uneven floor is detrimental to the bathtub since it becomes vulnerable to breaking.
So, to avoid such frustrating scenes, apply a coating on the floor space where you will set up the tub to make it even. At first, inspect where the unevenness is and use a notched trowel to apply the sealing compound on the floor. Now, let it sit on the floor before proceeding to the next steps of the bathtub installation.
Step 3: Setting Up the New Bathtub
After leveling the tub area, you need to place the bathtub right where it is meant to sit. It would help if you set the bathtub in the existing drain plumbing area. Then, carefully line up the tub with the spout tub plumbing. The tub pout may be made of water feed from copper.
During this phase, be patient and place the tub slowly; otherwise, its weight may damage the plumbing drain.
Step 4: Leveling the Tub and Proper Placement
Now, slowly level the bathtub on the floor and make sure all the corners are evenly placed. Now, use a short wood piece measuring 2” X4” along with a rubber mallet to tap in the bathtub into the proper place. While you use the mallet and wood piece to level up the tub, ensure that it slowly falls into the already leveled floor and sink with it correctly with the sealing compound.
Step 5: Screwing
Now, with the help of the drywall screws and cordless drill, screw the flange of the bathtub with the wall studs. Walk around the tub flange and install the screws every 6 inches. Make sure that the screws are correctly tightened with the wall stud.
Step 6: Inserting A Threaded Drain
It’s time to insert the threading pipe through the male thread into the bottom of the drain hole securely. The male thread should already be sticking up next to the bathtub. Remember that we are only synchronizing the new bathtub setting with the already existing plumbing set of the bathroom.
So, this should be effortless.
Step 7: Installing Overflow Components
Now insert the plunger, linkage, and overflow rod through the overflow hole of the bathtub and level it up with the overflow drain hole. Now, tighten the overflow drain components with screws.
Step 9: Threading the Tub Spout
Now, take a new bathtub spout pipe and carefully insert it through the spout hole to reach the elbow of the wall. Lastly, use a plier to fasten the threading spout. In the case of the copper pipe, you need not do anything since it comes pre-installed.
Step 10: Test the Tub
As you are about to finish your bathtub installing on the concrete floor, fill up the tub and make sure, the overflow drain and stopper are working properly. Also, check for the screws to ensure that they are tightened accurately.
That’s it- you have successfully installed the bathtub.
Conclusion
Although most people think that installing a bathtub on the concrete floor is a challenging task, the reality is quite different. With the above guideline on how to install a bathtub on the concrete floor, your workload will reduce significantly.
You also won’t need any professional plumber, which is a brilliant way to save a few bucks.
-
Pingback: How To Block A Bathtub Drain Without A Plug (New Tips)