
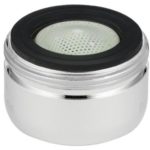
Flow restrictors are attached to the kitchen and bathroom faucets to control the water flow to a greater extent. In the first place, it saves more water consumption. On top of it, a water flow restrictor with aerator steps further to diminish the flow.
If you find the flow too low to accomplish your kitchen cleaning or bathroom washing, you might need to remove the water flow restrictor from the faucet. Furthermore, for cleaning or replacing purposes, it is essential to know how to remove water flow restrictor from kitchen faucet as well as bathroom faucet.
We have sorted out the solution to this problem, thanks to our long experience in the plumbing sector. So, are you interested in checking it out?
How To Remove Flow Restrictor From Kitchen Faucet

Home Water Works informed that the average water flow for a kitchen is 2.2 gallons per minute (GPM). Since 1994, according to the federal and state law manufacturer have been adding the restrictor to conserve water.
Nonetheless, after a while, sediments or debris will from in the restrictor, further reducing the flow. Thus, you must remove it to wipe out the residue and debris so that the water flow rate increase to the optimum level. Or, you can get rid of the restrictor forever, although it is highly discouraged.
Things you will need-

Get Adjustable wrench on Amazon
- Adjustable wrench
- Towel
- Screwdriver
Once you are all set with the necessary tools, it’s time to remove the water flow restrictor.
Step 1
One of the fundamental problems while removing the flow water restrictor that people face is the loss of screws. This happens as the small screws often fall through the sinkhole.
The owner of My Kitchen Advice says, “If you want to get rid of this silly problem, spread a towel on the sink blocking the holes. This will prevent the screws from going down into the holes and get lost.”
Step 2
Now, it’s time to remove the aerator at first. This is an extremely convenient process. You can remove the aerator with your hands by turning it into the counterclockwise direction. However, if you feel it too tight, we recommend you use an adjustable wrench.
Moreover, to avoid damaging the kitchen faucet, wrap it with a regular rubber band, and then hold it with the wrench. Then, turn the wrench counterclockwise to take off the aerator.
Step 3
If your kitchen faucet comes with a concealed aerator, you will need to purchase a unique removal tool. Don’t worry. You can get it easily in the nearby plumber shop or online.
Step 4
After removing the aerator from the kitchen spout, it’s time to remove the flow restrictor. This is pretty straightforward. Use a screwdriver to twist the flow restrictor so that it loosens up from the connection. Then, use the wrench to pry it off from the faucet.
That’s it. Now you can clean the aerator and the water flow restrictor to replace. Remember that removing the flow restrictor from most models like Delta, Moen, or Pfister is more or less similar. So, with this one process, you can actually sort out the flow restrictor problem of every faucet virtually.
We have also write about How to Tighten A Loose Moen Single Handle Kitchen Faucet.
How To Remove Flow Restrictor From Bathroom Faucet

If you want to remove the water flow restrictor from the bathroom faucet, you should understand the following steps. These are more or less similar to removing the flow restrictor from the kitchen faucet, so it should seem straightforward.
1.
Turn off the water supply source to make sure that no water drips out from the valve once you remove the flow restrictor.
2.
Now spread a towel on the basin to prevent the loss of small screws and other parts of the bathroom faucet.
3.
Use the wrench to remove the aerator (if the faucet comes with it). You have to move it counterclockwise. Id the valve comes without an aerator, you can directly remove the flow restrictor.
4.
To take off the flow restrictor, hold it with a wrench, remove necessary screws to loosen the grip, and then twist it counterclockwise.
5.
Once you are reconfirmed that it has adequately loosened, pry off it from the faucet.
You won’t have to do anything more.
Don’t miss our trick about How to Remove Kitchen Faucet Without Basin Wrench.
Conclusion
Removing a water flow restrictor is probably one of the most comfortable and most convenient plumbing tasks you will ever found. Nonetheless, people tend to consider it tough.
So, we aspire that from now on with these two detailed guidelines, and you can perform a DIY project to remove the flow restrictor from both the kitchen and bathroom faucet. It is money saving and doesn’t require much effort. So, give it a try.
Thank you so much Fiaz Sumra.